I really enjoy the
concept of being able to make old things new once again. I can spend hours on Pinterest going over
the thousands of pictures of upcycled items that ingenious people have managed
to recreate.
This week I wanted
to try my hand at doing just that, by turning some old jars into 4-in-1 button
organisers... I had so much fun and I loved them so much that I’m making a few
more for stocking fillers for the upcoming festive season!
Pattern of the week

Last
week I digitally created some minions as a way to sharpen my digital drawing
skills, as a result I found myself inspired to create the cross stitch
embroidery patterns.
We love these little yellow guys, they really just cheer up our days, and Facebook feeds. Why not embroider a few for yourself, or the little ones in your life this Halloween.
This is a set of 2 cross stitch patterns, a simple pattern, as well as a more complex pattern. Click on the image for more information.
Basic Sewing Course
We are hard at work
developing a range of sewing courses for you. We are launching our very first
Basic Sewing Course in January 2017. With over 15 years of experience behind us
and two diplomas, we are proud to finally be able to share our knowledge and
skills with you.
Over the course of 5 weeks, you will receive 5 video classes cover basic sewing essentials. Once you have successfully completed the classes and assignments, you will receive a certificate on completion of the course.
Over the course of 5 weeks, you will receive 5 video classes cover basic sewing essentials. Once you have successfully completed the classes and assignments, you will receive a certificate on completion of the course.

Tutorial of the week
4-in-1 upcycled
button jar

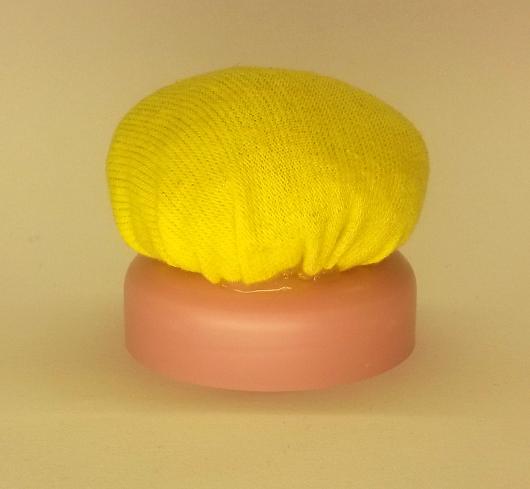
My daily moisturiser
comes in these cute glass jars. I’ve been using them as sewing pattern weights,
but lately I have been asking myself what I could use to make them slightly heavier,
and more effective as pattern weights. This weekend I was inspired to turn them
into button organisers too.
Not only that, but I
included a pin cushion on top (for when I use pins instead of weights). But it’s
not a basic pin cushion, it’s a pin sharpening pin cushion. How did I manage
this? By stuffing my pin cushion with steel wool, instead of standard foam or
stuffing. The steel wool sharpens my pins!
What more could a
girl want than a button organising, pin sharpening pin cushion of a pattern
weight... and they’re so quick and easy to make, I’ve already made myself
three!
What you will need
- Some scrap fabric you have lying around, cut into a circle
with a 10cm / 4” diameter
- Ball of steel wool
- An old jar
- Hot glue gun
- Sewing needle and thread
- Ribbon
- Decorations such as more ribbons, bows, buttons, etc

Steps
Step 1: Gather your circle of fabric by feeding your thread along the
edges. Stuff your circle of fabric with as much steel wool as possible and sew
closed.

Step 2: Hot glue your stuffed circle
onto the lid of your jar, open side down.
Step 3: Hot glue your ribbon around the jar, covering the join between your
fabric and lid.

Step 4: Your lid is now ready for you to add all your decorative features.
Go crazy, and feel free to share your creations with us on Twitter @MySewingPattern
Your new button
organiser is ready to use!

No comments:
Post a Comment